
What Is RPCS3?
RPCS3 is a free, open-source PlayStation 3 emulator and debugger that allows users to play and debug PS3 games and homebrew software on Windows, Linux, macOS, and FreeBSD operating systems.
RPCS3 Setup & Configuration Guide
Getting Started
This guide is split into two sections. First, we provide a universal script to automatically install RPCS3 across all major Linux distributions (including Ubuntu, Mint, Fedora, Arch Linux, and CachyOS).
In the second section, we will walk you through configuring the emulator step-by-step so you can start booting your games.
1. Automated Installation
Run the following command in your terminal to automatically download the latest RPCS3 AppImage, configure its shortcut, and set up the desktop application menu icon:
curl -sSL https://raw.githubusercontent.com/rmuxnet/ps5-linux-guide/main/docs/public/scripts/PS3/rpcs3.sh | bash2. Configuring The Emulator
Step I : First Launch Of Rpcs3
Upon launching the emulator for the first time, a welcome window will appear. To proceed, please check the box indicating you have read the Quickstart guide and enable the desktop shortcut option. We also recommend unchecking "Show at Startup" for a cleaner launch experience in the future. Additionally, you can optionally enable Dark Mode here to match your system preferences.
👉 Official Guide: RPCS3 Wiki: Quickstart
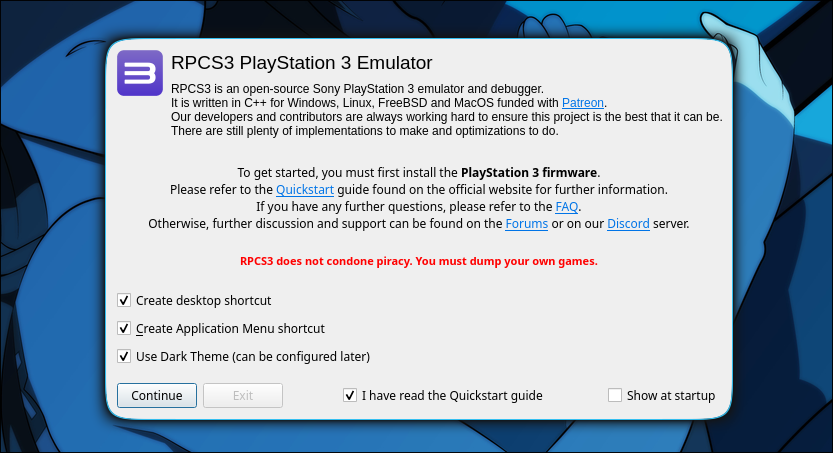
Once RPCS3 is configured and running, you will need to install the official PlayStation 3 system firmware. You can download the required PS3UPDAT.PUP file directly from Sony’s official support page:
Step I.1 : Install PlayStation 3 Firmware
- Download the official PS3 System Software firmware (
PS3UPDAT.PUP) directly from the Official PlayStation PS3 Support Page.
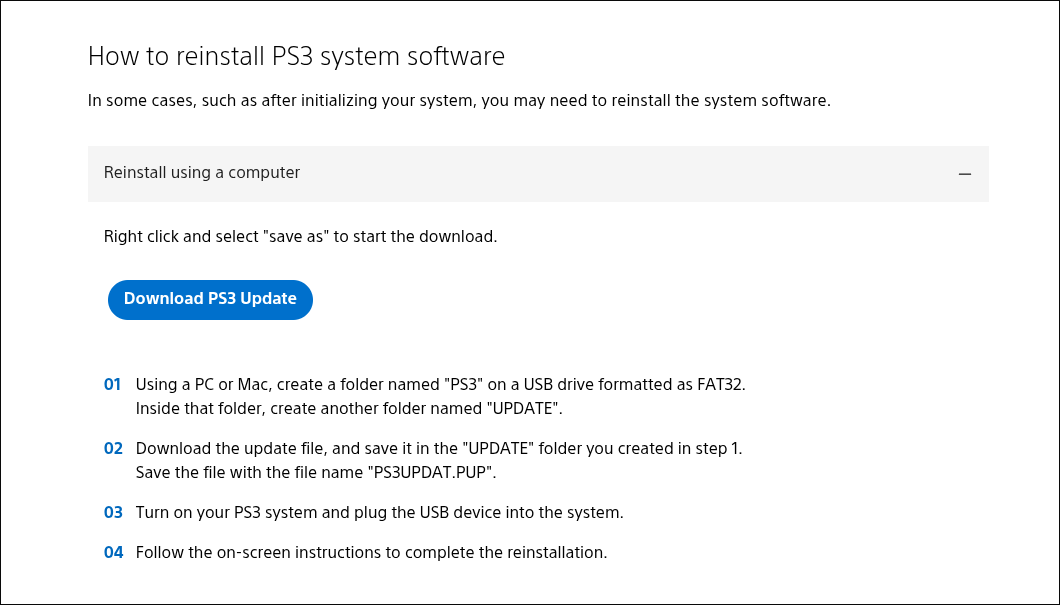
- Open RPCS3, click on File > Install Firmware, and select the downloaded file.
Step I.2 : How to play games
Piracy Notice
This guide does not condone or support piracy in any form. To comply with copyright laws and support developers, you should exclusively use your own legally dumped game backups.
To play games on RPCS3, you will need to back up your own legal PlayStation 3 game discs or digital purchases.
For an step-by-step guide on how to properly dump your physical media using a compatible PC Blu-ray drive or a jailbroken PS3 console, refer to the official documentation:
👉 Official Guide: RPCS3 Wiki: Dumping PlayStation 3 Games
To import your games, open the File menu at the top left of RPCS3:
- For .iso formats, choose Add ISO Games and select the file.
- For folder formats, choose Add Games and select the game folder.
Step I.3: Confirming Game Installation
Once you select your game folder or .iso file, a confirmation popup will appear indicating that the software was successfully added to your game list.
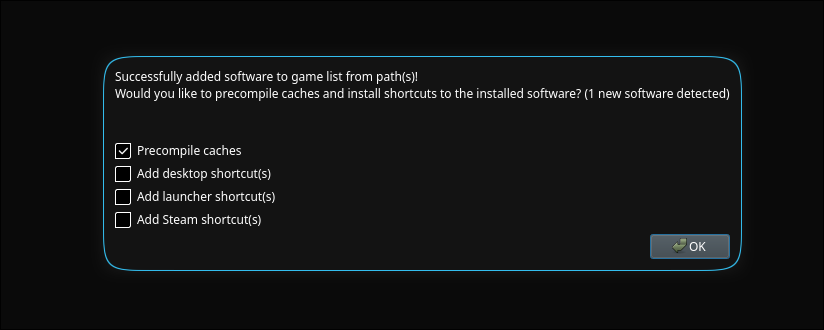
Configure the following options based on your preference, then click OK:
- Check:
Precompile caches(Highly recommended – this helps reduce stuttering when you launch the game). - Add desktop shortcut(s): Check this if you want a direct launch icon on your Linux desktop.
- Add launcher shortcut(s): Check this to add the game to your Linux system applications menu.
- Add Steam shortcut(s): Check this if you want to launch this PS3 game directly through your Steam library layout (perfect for handhelds or controller-focused setups).
Step 3. Launching Your Game
Congratulations! You have successfully installed and configured RPCS3. Your game collection will now appear in the main library grid. To begin playing, simply double-click your game of choice and enjoy!
Note on First-Time Launch
When you start a game for the very first time, there will be a brief delay while RPCS3 compiles the necessary graphics shaders. This process happens only once per game, subsequent launches will load instantly!
Performance Tuning for Demanding Games
The PS5's CPU (Zen 2) sits below RPCS3's officially recommended spec (Zen 3 or newer), so heavier titles (God of War: Ascension, Killzone 2/3, The Last of Us) need real tuning, not just default settings, to be playable:
- Right-click a game -> Download Config Database first. This pulls the community-recommended per-game settings from RPCS3's own site and is a far better starting point than defaults.
- SPU Block Size: Mega helps demanding titles noticeably (confirmed on Killzone 2/3, GoW: Ascension).
- Disable MLAA in game patches if a heavy title is chugging, this post-processing effect tanks framerate disproportionately on this hardware, disabling it is often what actually makes GoW: Ascension/Killzone playable rather than SPU settings alone.
- RSX FIFO Accuracy: Atomic/Ordered & Atomic, and VBlank Frequency: 120Hz helped in some reported cases, worth trying alongside the above.
- Multithreaded RSX is game-dependent, big framerate gains on some titles (Motorstorm nearly doubled), but net negative on others (GTA V ran worse with it on). Toggle and compare rather than assuming it always helps.
Root cause for titles that stay rough even after tuning: this hardware's GDDR6 has notably higher CPU-facing memory latency than a typical gaming PC's DDR, which hits PS3 emulation (heavily CPU/SPU-bound) harder than it hits native games. There's no software fix for this, it's a hardware characteristic of the platform.
Technical Support Disclaimer
This guide is an independent community resource and is not affiliated with, endorsed by, or linked to the official RPCS3 development team. As such, we cannot provide technical support or software bug fixes.
If you encounter performance issues, compatibility errors, or crashes, please consult the official documentation: 👉 Official Resource: RPCS3 Wiki